Getting Started
Created 4 Mar 2026·Updated 27 Sept 2026
Open TipLink NowBy the end of this guide your stream will react to real events on its own, with no coding involved.
Most people are up and running in about ten minutes.
Before You Begin
You need:
- A Windows PC with TipLink installed. See Where To Download TipLink below — it depends on where you bought it.
- A licence, or an active free trial. See Licensing Options.
- At least one platform account, such as Twitch, Kick, Fansly or Ko-fi.
Where To Download TipLink
Where you get the installer depends on how you bought TipLink.
| How you bought it | Where to download |
|---|---|
| Patreon subscription, or a free trial | The Install TipLink post on Patreon. It is patrons-only, so sign in with the Patreon account your membership is on. |
| Jinxxy licence, or an existing Gumroad or Payhip licence | Your email inbox. Your purchase order receipt holds both the download link and your licence key. |
Search your inbox for the store you bought from, and check your spam folder. If it is still missing, see Support & Contact.
Step 1: Activate Your Licence
The first time you open TipLink it asks you to activate.
-
Choose where you bought TipLink from the Purchase Platform dropdown:
Option What to do next Patreon No key needed. You will sign in through Patreon instead. Payhip Enter the licence key from your receipt. Payhip no longer sells new licences, but existing ones still activate. Gumroad Enter the licence key from your receipt. Gumroad no longer sells new licences, but existing ones still activate. Jinxxy Enter the licence key from your receipt. I was given an Activation Code, not a License Choose this if you were sent a code directly rather than buying through a store. -
If you picked anything other than Patreon, type your License Key. It looks like
XXXXX-XXXXX-XXXXX-XXXXXand is in your email receipt. -
Tick the box to accept the EULA, Privacy Policy and Refund Policy. The activate button stays greyed out until you do.
-
Click Activate License, or Login with Patreon if you chose Patreon.
Your email receipt tells you. If you subscribed monthly rather than paying once, you are on Patreon.
A full licence covers one PC. If you are moving to a new computer, see Support & Contact.
Step 2: Let the Setup Wizard Do the Work
Once activated, a setup wizard opens automatically. This is the fastest route, and it builds a working alert for you.
It has six steps:
| Step | What happens |
|---|---|
| Welcome | A quick overview of what you are about to do. |
| Connect | Pick your streaming platform and sign in. |
| Devices | Optional. Set up PiShock or OpenShock now if you have one. Skip it if you do not. |
| Template | Pick a ready-made alert and fill in a couple of values. |
| Test | Fire it once so you can see it work. |
| Go Live | Done. |
About the templates
Templates are complete alerts built for you. You only fill in the parts that are personal to you, such as a minimum tip amount or a shock intensity.
There are templates for things like:
- Shock or vibrate a device on every tip
- Play a sound when someone gifts subscriptions
- Trigger a VRChat avatar reaction on a new subscriber or a raid
- Switch an OBS scene when a channel point reward is redeemed
If a template needs something you have not connected yet, the wizard tells you so and shows a Manual Setup Required notice instead of failing quietly.
If you finished the wizard, you already have a working alert. Skip ahead to finding your way around.
Go to Settings, find Help & Onboarding, and click Restart Onboarding Tour. Useful if you skipped it, or if you want to add another template later.
Doing It Yourself
If you skipped the wizard, or you want to understand how the pieces fit together, here is the same job by hand.
Add a platform account
-
Click Platforms in the left sidebar.
-
Click Add an Account and pick your platform.
They are grouped to make them easier to find: Streaming Platforms, Tips & Donations, Chat Bots, Streaming Tools, Devices, Music, Games & VR, and Advanced.
-
Follow the steps in the window that opens. Some platforms only ask for your username. Others send you to their website to approve access.
Your account then appears in the list.
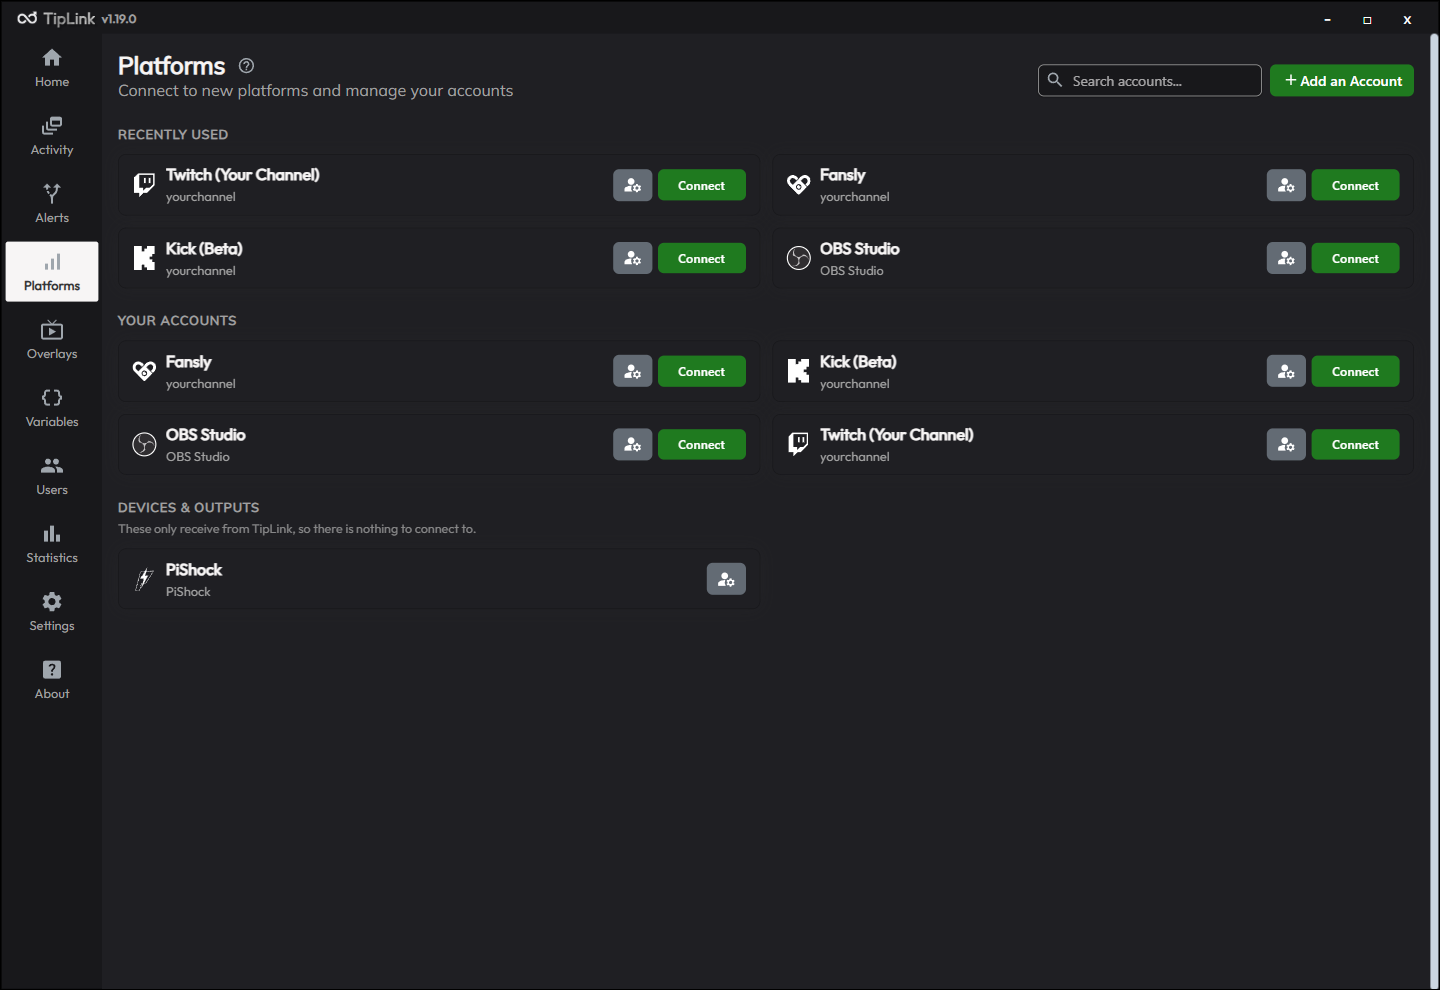
The Platforms page is organised to keep the clutter down:
- Recently used accounts sit in a short list at the top, so the ones you actually stream with are easiest to reach.
- A search box next to Add an Account filters by platform or username.
- Devices & Outputs is its own section, holding things like PiShock, OpenShock and bot-only chat accounts, so they are not mistaken for accounts waiting to be connected.
Connect it
Adding an account saves your details. You still need to connect it before TipLink listens.
- On the Home or Platforms page, find your account.
- Click Connect.
- The button turns red and reads Disconnect once it works.
Open the account's settings and turn on Auto Connect so it connects itself whenever TipLink starts. Accounts set to auto-connect carry a small icon on the Platforms page, so you can see at a glance which ones look after themselves.
A failed connection shows a message naming the problem, rather than leaving the button green with no explanation. That covers reconnects that happen in the background too, so a platform dropping mid-stream does not pass unnoticed.
Create an alert
An alert is a rule: "when this happens, do these things."
- Click Alerts in the sidebar, then Create New Alert.
- Give it a Title, for example $5 Donation Alert.
- Under Platforms, choose which platform it watches.
- Choose the account it applies to.
- Under Valid Events, choose what sets it off, for example Tip/ Donation.
- Fill in any conditions that appear, such as a minimum amount.
See Triggers for everything you can filter on.
Add an action
Actions are what actually happens. Let's put an alert on screen.
-
Scroll to the Actions section and click Select an action type.
-
Search for Stream Overlay, or browse the categories. Its settings open on their own once added.
-
Choose the overlay canvas to use, or create one first. See Stream Overlays.
-
Write your message, for example:
{{ username }} donated {{ value }}!Click the
{{ }}button beside any text box to pick from a searchable list of everything the event carries, so you never have to guess a field name. -
Pick an animation and a duration.
-
Click Save.
You can add as many actions as you like. Show an overlay, post to Discord and trigger a device, all from the same event. Browse every action.
New alerts open in Advanced Mode, which gives each action extra settings such as a chance percentage and its own cooldown. They are collapsed by default and safe to ignore while you are starting out.
Test it
Do not wait for a real viewer.
- On the Alerts page, click the ⋮ menu beside your alert.
- Choose Test Event.
- Fill in some pretend values, such as a name and an amount, then fire it.
Your overlay should appear with the values you typed.
Two other ways to test:
- Test Actions from the same ⋮ menu runs the actions straight away with generic values, with nothing to fill in.
- Replay on the Activity page re-runs a real event you already received.
Finding Your Way Around
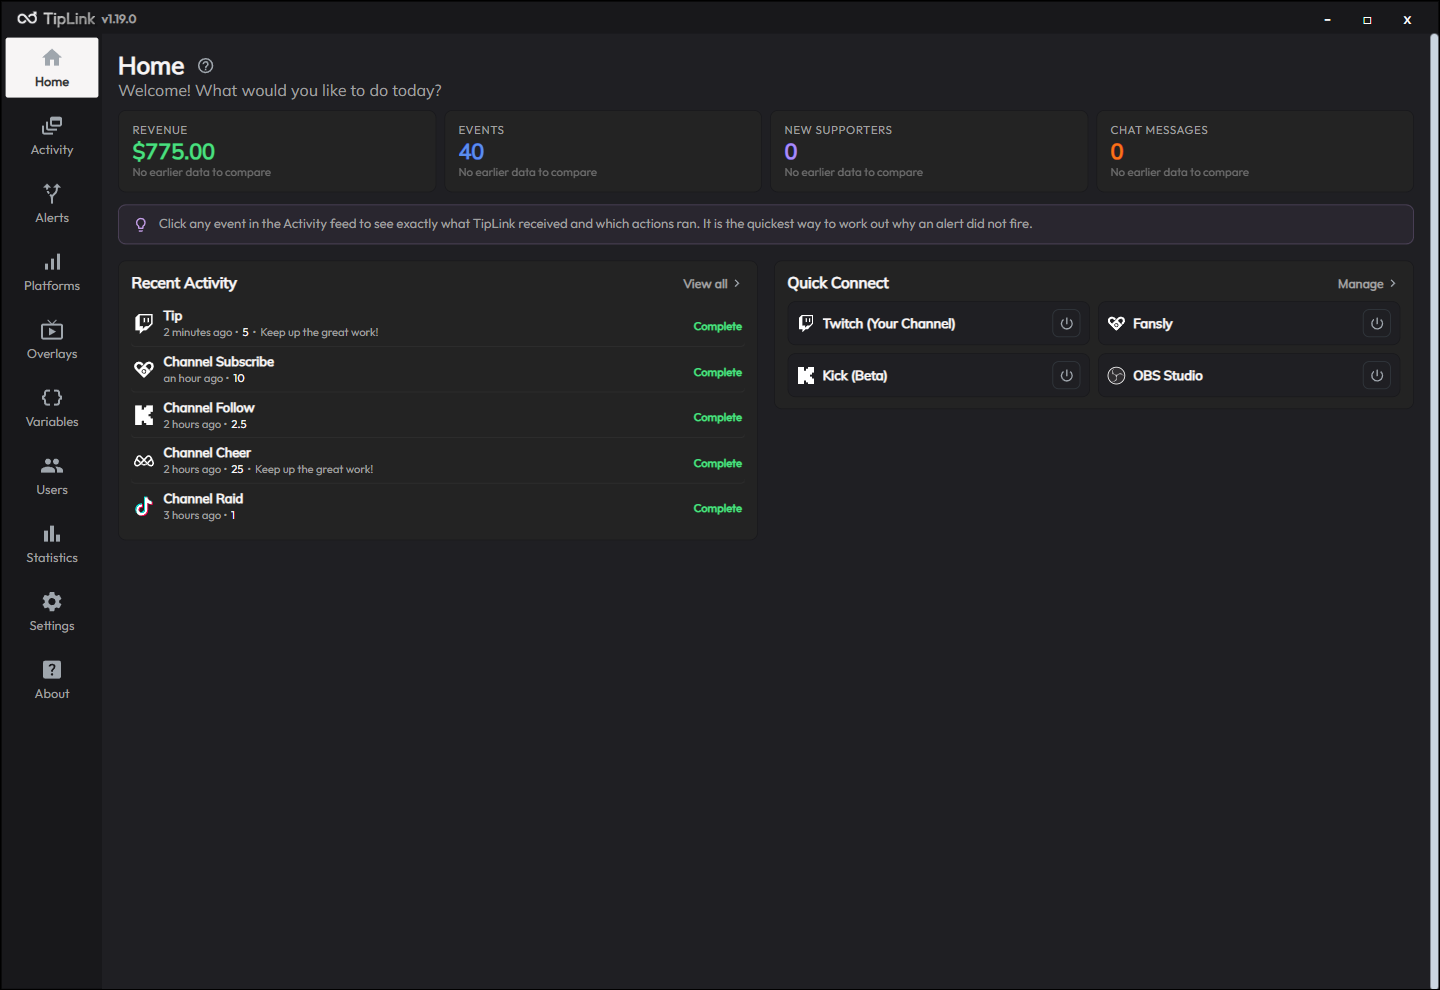
The Home page is your dashboard.
| Part | What it tells you |
|---|---|
| At-a-glance tiles | Revenue, Events, New Supporters and Chat Messages over the last 7 days, each compared against the 7 days before, so you can see whether things are up or down. |
| Quick Connect | A compact grid of your most recently used accounts. Each has a power button that lights up when connected. Hover a tile for the account name, or see it on the tile itself when you have two accounts on the same platform. |
| Recent Activity | Events as they arrive. Only genuine problems are highlighted, so a failure stands out instead of getting lost among routine statuses. |
| Tip of the day | A different pointer each time you open the page, covering features that are easy to miss. |
System Messages used to live here. They are now on the About page.
The left sidebar holds everything else: Alerts, Platforms, Overlays, Variables, Users, Statistics and Settings.
Every page carries a Help icon that opens the matching page in this documentation.
When Nothing Happens
The most common first-time problem is an alert that will not fire. Work down this list in order.
1. Is the account connected?
Check Quick Connect on the Home page. A lit power button means connected. You can also check the Platforms page, where the button reads Disconnect in red when it is working.
If it will not connect, the message TipLink shows names the reason. Check that platform's page under Connect Your Platforms for what it means.
2. Did the event arrive at all?
Open the Activity page. If your event is not listed, the problem is the connection, not the alert.
3. Is the event type being recorded?
Every account excludes Chat Message events by default. If you are building a chat command, open that account's settings and remove Chat Message from Excluded Events.
4. Did the event arrive but nothing ran?
If Activity shows your event as No Matching Alert Found, the event arrived fine but no alert matched it. Use the Event Testing Tool and click Check Conditions. It tells you exactly which condition failed.
5. Is the alert switched on?
Check the toggle on the Alerts page. Also check whether it sits in a disabled Alert Set, which stops it firing even when the alert itself is enabled.
6. Is another alert winning?
Only the first matching alert fires. If a more general alert sits above yours, it takes the event. Drag yours higher, or turn on Always Trigger. See Alerts.
Still stuck? Support & Contact.
You're Set Up
Here is where to go next.
| I want to... | Go here |
|---|---|
| Connect more platforms | Connect Your Platforms |
| Build more precise alerts | Triggers |
| See everything TipLink can do | Actions Overview |
| Control OBS from my alerts | OBS Studio Actions |
| Reply in chat automatically | Twitch: Send Chat Message |
| Show a goal progress bar | Goals |
| Add a death counter or timer | Variables |
| Give viewers points to spend | Points & Viewers |
| Stop alerts firing too often | Cooldowns & Rate Limiting |
| Trigger a PiShock device | PiShock Setup |
| Build my own overlay widget | Custom Widgets |
| Back up everything | Export & Import |
| Understand a past event | Activity Log |